Tuesday, February 28, 2012

Weekend Progress 26 Feb

I ordered a set of 300 led 5 m lights off evil-bay. Got the power supply and
dimmer.  The shipment arrived really fast, little over a week. the LED's were about
$11-12, power supply about 10 and the dimmer 8-9. Dimmer is 8 amp so it should
do 2-3 sets of lights. The led strip already had wires attached and the power
supply had a neat adapter so you just screwed wires in like a DCC power station.

Below are shots of the lights, the dimmer, the hookup and some test on the
middle peninsula. One set at about 11", other about 9". Folks had warned me
they would be dimmer than CFL's and they are, it will probably take 2-3 strands,
at least at the 11" distance.

All in all, I was very happy with the result. I'll use CFL's where I have
21-24" deck separation and LED's for the 9-11".  Did a test install, here are some of the results.

They arrived in antistatic packaging, very nicely packaged.


They are prewired and the power supply has a nice adapter that screws on.


Here is a picture at 11"


They sell a nice 8 amp dimmer for $8-9.


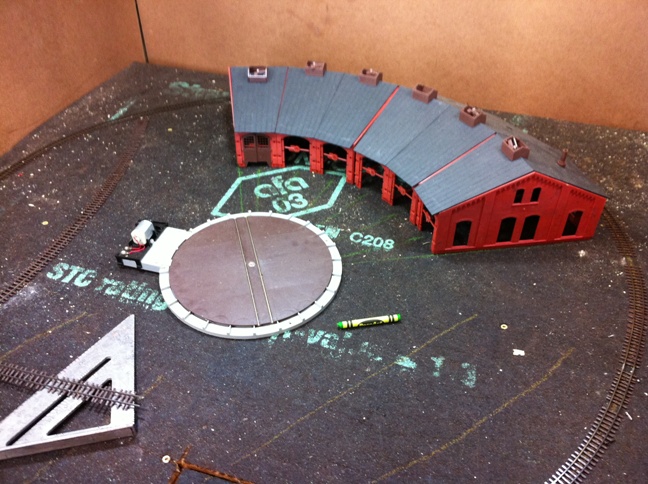
Below is a picture of the placement of the Roundhouse and temporary TT.  Managed to
get a good part of the main-line turn-outs in in the Denver yard. Also mounted
another 6-7 CFL's. got to the left wall where the Smelter will go. Really
wanted that done so I could begin laying code 55 to Golden.

Here is  the Compact Fluorescent lights over the roundhouse.  That is a temporary Turntable, but it worked to help figure out the relative placement.


The Denver yard main track.  Engine and Yard switch off this line.


This is the turn to the left wall, the Smelter will take up the entire corner and the yard the rest of this side.


Making progress, wish it could go faster, just have to be patient.

Thursday, February 23, 2012

Mid Week update

Spent last 2 days making turnouts, so not a lot to share.

Cameron / OD

Tuesday, February 21, 2012

LED's

Had my first experience soldering wires on LED 0603's.  Magnet wire is 36g and is the size of a hair.  It is coated for insulation and to make a connection you have to burn the insulation off.  The LED has to be fluxed and solder put on both the positive and negative side.  Care must be taken as the LED's can be destroyed by overheating.  Also care must be taken as LED's must have a resistor on the Cathode side (negative) or it destroys LED.

The first one took over an hour and I destroyed 2 before I got one to work.  2nd one went much better, took less than 5 minutes.


The last picture is both together using different resistors to change brightness.  The little teesting rig is a 9 volt with leads soldered on and different value resistors on the negative lead so you can check brightness you want.

It's Alive part two

Made good progress Monday, had the day off and worked 6-7 hours.  The deck 1 lighting is progressing, adding several lights a day.  Concentrated on Denver Yard and got about 10+ ft of track down and worked out the actual track vs the plan. 

Surprisingly it is going pretty close to plan.   On Rail Forums someone had suggested reversing yard to make reaching switches easier, but after laying it out, went back to the plan Keevan helped me with.  Seems like everything is going to fit well, the layout actually is not as tight as the drawing for space.


Shows how I did the deck 1 lighting (middle peninsula will be led's if they work-out.  Then how lighting looks over reverse loop in Denver with Roundhouse shuck in for reference.  Also show mogul running on DC up middle peninsula with switch.  Changed colors to show revised creek's path.


Lack of switches is slowing me down so hope to knock out a bunch thins week.

Sunday, February 19, 2012

It's Alive!

Today was a good day on the DG&CC RR. Even better, off tomorrow for Presidents day so hopefully another long work session.

Highlights were:

  • Laid almost 50% of the middle peninsula track and ran both a DC Brass Mogul and a DCC Blackstone 2-8-0. First run of anything on the new layout so really happy about that milestone.
  • Put in 2 T-5 over head lights
  • Began install of deck 1 lighting. Used ideas from the forums; this first set is CFL every 2 ft (Daylight 60w). Ordered LED's to use on the middle peninsula where height between decks is an issue. Found medium base sockets at Lowes for $1.34. Home Depot has a slighly better one for a few cents more. Wired in a dimmer and surprisingly it worked some on the regular cfl.


Here is a picture of the inaugural run of a Blackstone 2-8-0 C-19.

The little squiggle is where I was working out the cut for the creek.

All in All a good day. Hope to post some details on the lights and some more pictures tomorrow. Will use a real camera instead of my iphone.

Tuesday, February 14, 2012

Beginning Track

Might sound trivial, but to me it was a milestone.  I began laying track Monday Night.  Only fitted 2 180 degree turns on the middle peninsula, and one 90 degree from Golden to the entrance to the middle peninsula.

Took over 90 minutes but was using a sweepstik from Fast Tracks to ensure perfectly even curves.  Soldered the 2 pieces of flex track in the middle before shaping to ensure smooth, even curve.  Next step is to pin these down and begin connecting with flex-track and switches.  Then a test run and a final determination on roadbed.  Either mounting directly to blackboad, Luan, or Homabed (precut Homasote).

Had so many track issues on previous layout I'm focusing 100% on reliable track first.

Also began on lighting.  Here are the options I'm had recommended to me and am testing, all based on lighting deck 1 & 2 with a total run of 200', deck 3 lighting will be a different solution):
  • T-5 3' double bulbs, plenty of light, but a over $20 each and rapid light fall off on ends it seems to be too costly.  Also middle peninsula is too short between decks.  At $6 per foot lighting it would be over $1200.
  • Individual lights every 2 feet - option 1 making using 14 awg wire and plastic ceiling sockets (1.35 at Lowes).  depending on bulbs the cost would be $50 for wire, $135 for ceiling sockets, and bulbs 100 - 200 depending on type up to 500 for dim-able.  Total cost $285 - 685 or about 1.50 to 3.50 per foot.  This has major advantage of being dim-able if the more costly option chosen.  Option is shallow enough to fit most if not all spaces.  Looked at candle base but could not find inexpensive sockets and bulbs cost more.
  • Individual lights every 2 feet - option2 using pre-wired commercial strings from PartyLight.com.  Cost is $179 for wiring and would require 2 sets.  Bulbs as above in option 1.  Cost $460 - 860 with per foot cost $2.30 - 4.30.  As above this option is dim-able with the proper bulbs.
  • Above options using incandescent bulbs.  Cost similar to low end of 1.50 per ft and are dim-able.  Issue is power usage, lifespan, and heat.  Using a mix with over time replacement of incandescent bulbs mght be the way to go to start at a lower cost and over time over to dim-able cfl's.
  • Rope lights - my friend Keevan has a neat implementation of these with white, amber, blue (for night) and red (for sunset).  Lumens is my main concern there, will be investigation this one more with actual testing.  Rope lights are inexpensive at around $2.00 per foot, so total cost per strand for led.  I believe these should dim by using a variable transformer.
  • LED Strip lights - these are available in many colors and are similar to the LED rope lights.  Supplier on e-bay has for roughly $10 per 15' (5 meters).  Should be dim-able using variable transformer.  Total cost $140.00 per strand, or $.60 per foot.  Cost of transformer also needs to be factored in.  As with rope lights, will have to experiment as light output (lumen) could be too dim requiring multiple strands.
So as you can see, a lot of trial and error as I go.  Right now hoping LED's work out, if not I will likely go to either making my own with ceiling mounts and using CFL or mixed CFL and incandescent bulbs.

Sunday, February 12, 2012

Benchwork done - woot!

This was a banner weekend, the rough benchwork is in with the blackboard covering. 

Front Wall with all 3 decks visible.


Back wall, where lumber is showing is deck 1


Here is the middle peninsula from the back, you can see how the trains travel up the grade.  The top is Georgetown and the loop, access is from Idaho Springs on Deck 2 back wall.

 Middle peninsula from the front.  The last ramp exits to Forks Creek which then Y's to Blackhawk on right and Idaho Springs on the left.


This is a shot of the middle peninsula from the front.


Still need some transitions:
  •  Deck 1 Denver to Golden
  • Deck 2 Blackhawk south to north and Gilpin Tram
  • Deck 2 Idaho Springs to Deck 3 Georgetown
  • Deck 3 Georgetown loop to Silver Plume
  • Deck Gilpin Tram to Central City
Will begin laying the test track next.

Thursday, February 9, 2012

Deck 3 beginning pictures

Well both the front and back of deck 3 are roughed in.  Had to move the middle loft (storage) up and this turned out to take about 2 days to do.  Wife and son helped, boy does my back feel it.  The completed by putting insulation in place.  Thinking about going  back and using left over tempered board to cover lower insulation on rafters.  This would allow sky and clouds to be painted.

Here is deck 3 front, back is same but 3" higher to allow a nod under (or removable) connector from Idaho Springs to Georgetown.

Need only 4 more pieces of plywood to finish decking.  They are sure proud of that stuff, costs have sky rocketed.  Whoever says inflation is 3-4% sure doesn't live where I live.

Next step is to put 1x2 on the third tier to complete the L-girder, then permanently do the supports.  That may be a little in the future as I have to figure out how to hide them.  May go up to ceiling instead of down to deck 2.  Strapping or a threaded rod would work really well.  I like the idea of the threaded rod as it is adjustable and small so hiding it will be easier.  Maybe inside a mountain, trees or smoke even.

Cameron / OD

Monday, February 6, 2012

Deck 3 begun

Well made some progress this weekend.  Deck 3 is now under construction.  Had to take-out the middle loft storage area which burned a lot of time.  Pictures will have to wait til next week.

Also built my first hand-laid turn-out, here is a photo.

Thursday, February 2, 2012

Progress on the 2nd deck

Had a few good work sessions after work.  Made good progress on deck 2 on all 4 walls.  Completed the tempered board for the backdrop too.

This is the front wall with the L-girders for deck 2 put in.  Leveled out nicely.  The permanent legs will be placed in where they can be hidden.

This is the left corner to the rear wall. the back wall is 22' long anf the left wall is roughly 12'.  The back wall on the left is going ot be a switch-back to Central City for the HOn30 line (Gilpin tram was really 2 ft but HOn2 requires scratch-building Shays, not up to that yet.


You can see the tempered board covering the walls.